lab-helper-codes
Helpful guides and examples to make life easier.
Creating a task in S3
- Step 0
- Create buckets for task
- Uploading your task to S3
- Update bucket to host task
- Syncing your task to its
task-data-rawfolder - Configuring a CloudFront deployment
- Configuring task web domain on Route 53
- What next?
- Specific task variations
Overview
In this guide, we discuss how to create, configure, and upload content to an AWS bucket to host your task website.
Imagine a bucket as a sophisticated GitHub or Google Drive folder that gives you the ability to host an experiment website and save data from that experiment. This tutorial should take 30-45 min the first time, but with practice you can finish the whole sequence in less than 10 min.
You can find out more about buckets in general on AWS’s documentation.
Step 0
Make sure AWS is configured, which means your account is working with permissions to create and edit buckets in S3.
Create buckets for task
-
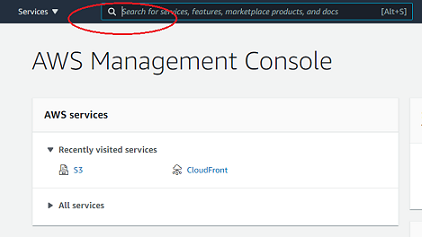
Log into the AWS Console and navigate to S3. To do this, you can use the search bar to search for s3.
-
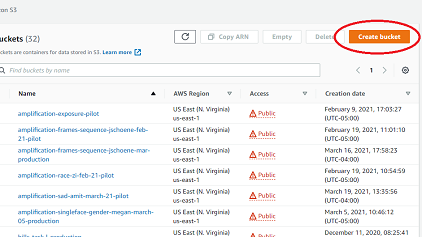
For your new task, you’ll ultimately create 2 buckets. The goal of 2 buckets is to separate data records based on the experiment phase (and reduce confusion). The 2 buckets are:
yourtask-yourName-month-year-pilot- this stage is for testing the task and running the initial batch of participants (~20-30 individuals)
- if any issues arise in this stage, make sure to change it before you run the “real” experiment
yourtask-yourName-month-year- this stage is for the real experiment
Example: pilot - amplification-sad-amit-march-21-pilot; “real” experiment = amplification-sad-amit-march-21
-
Now we will make a bucket. Click the Create bucket.
-
Enter your bucket name under Bucket name.
-
If your new bucket’s settings are similar to a pre-existing bucket’s settings, simply navigate to Copy settings from existing bucket and select your bucket-to-copy from there. You may still have to uncheck Block all public access, but you are now done with this step.

-
If you are making a new bucket with settings from scratch, proceed with the following.
- Select US East (N. Virginia) us-east-1 as the region.
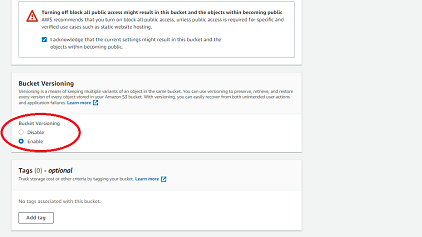
- Uncheck the Block all public access box. This will prompt a new box to appear, confirming that you want to do this. Check the confirmation box.
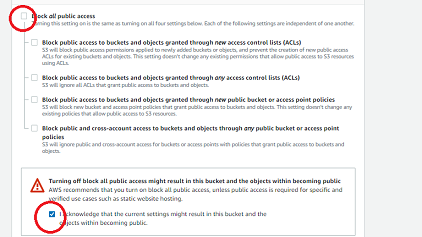
- Enable bucket versioning by selecting Enable under Bucket Versioning.
-
- Add tags to help differentiate the task:
- {Key: lead-name, Value: your-name}
- {Key: alternate-lead-name, Value: another-name}
- {Key: month, Value: month}
- {Key: yr, Value: year}
- {Key: taskName, Value: task-name}
- Click Create bucket. You will return to the bucket menu.
Uploading your task to S3
- On your computer, gather the task materials you will upload to S3. For example, you may have a structure of files that looks like this:
.
├── external-html/
│   └── consent.html
├── index.html
├── jspsych/
└── stimuli/
  ├── 1.jpg
  ├── 2.jpg
  └── 3.jpg
- Click the Upload button, and drag-and-drop all of your files into AWS.
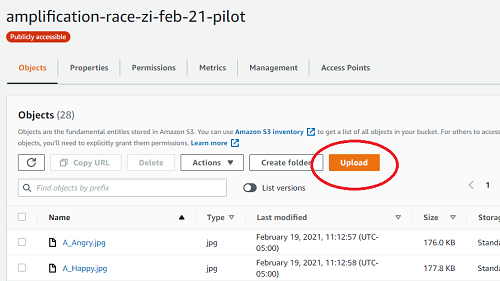
- IMPORTANT: if you don’t drag and drop, AWS WIll NOT upload your folders. That means any
img/,jspsych/, etc will not be in the bucket, resulting in a broken website.
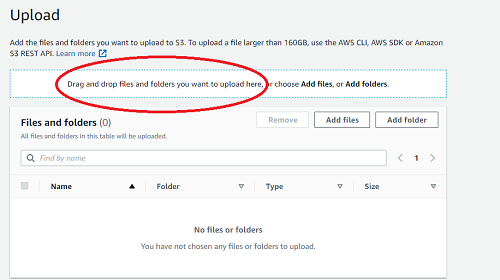
- IMPORTANT: if you don’t drag and drop, AWS WIll NOT upload your folders. That means any
- Confirm that the files are correct and click Upload.
Update bucket to host task
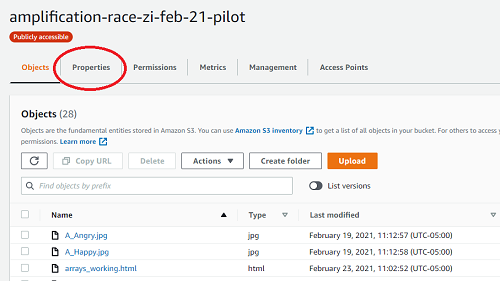
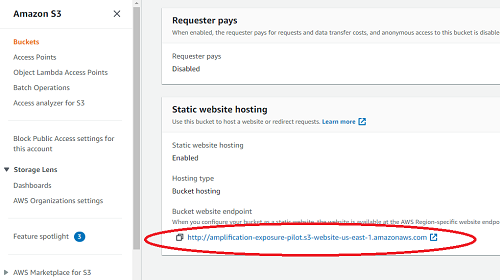
- Navigate to the bucket menu. Click on Properties.
- Scroll down to the bottom of properties, where you will find Static website hosting. Enable it.
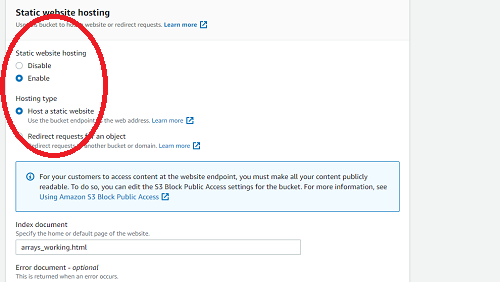
- It will expand; select Use this bucket to host a website.
- It will prompt for an Index document. Put the
.htmlof your main task file here. - (Optional, but recommended) Add an
error.htmlfile that AWS will route to in case of errors in server-side logic that happen from time to time. - Click Save.
- The URL of the non-secure website of the task will pop up. You will need this URL later when you set it up to redirect to the secure version of the site
- It will prompt for an Index document. Put the
-
Now click on Permissions.
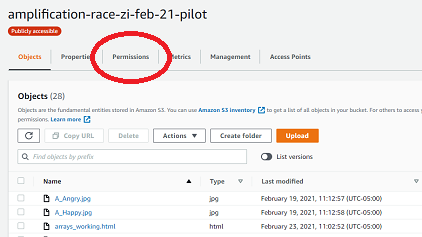
- Scroll down mid-way until you reach Bucket Policy.
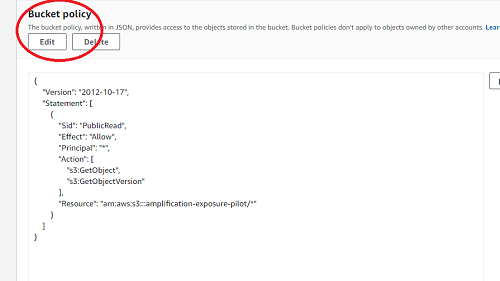
- A code block editor should appear, and inside of that, paste the following
(note that
name-of-bucketneeds to be replaced by the actual name of your bucket!) :
{
  "Version": "2012-10-17",
  "Statement": [
    {
      "Sid": "PublicRead",
      "Effect": "Allow",
      "Principal": "*",
      "Action": [
        "s3:GetObject",
        "s3:GetObjectVersion"
      ],
      "Resource": "arn:aws:s3:::name-of-bucket/*"
    }
  ]
}
- Click Save and follow the prompt to confirm that this should be public.
- Your bucket is ready to configure with CloudFront.
Syncing your task to its task-data-raw folder
We save to a bucket called task-data-raw. So, if the task is called
potato, we save data to a folder located
within-bucket: task-data-raw/potato.
To save data from a task, whether it is in pilot, or the actual task, you must use the AWS Browser SDK. There are two ways to use the SDK. The most common way is through a direct script link in the main HTML file:
<script src="https://sdk.amazonaws.com/js/aws-sdk-2.713.0.min.js"></script>
Next, add the saveDataToS3() javascript function to your task as well:
/*
 * You must use this cognitoIdentityPool string value and
 * the "task-data-raw" value for DATA_BUCKET. The DIRECTORY value
 * will change based on the task.
 */

const cognitoIdentityPool = "us-east-1:0f699842-4091-432f-8b93-a2d4b7bb5f20";
const DATA_BUCKET = "task-data-raw";
const DIRECTORY = "your-task-bucket-name-with-stage-goes-here";

/*
 * Save data at any point to S3 using this function.
 * It takes as arguments the string identifier of a participant
 * and the data in CSV form from the jsPsych data getter.
 */

function saveDataToS3(id, csv) {

  AWS.config.update({
    region: "us-east-1",
    credentials: new AWS.CognitoIdentityCredentials({
      IdentityPoolId: cognitoIdentityPool
    }),
  });

  // You can change anything after the first `/` here, but only if
  // you know the intended behavior of changing this.
  const filename = `${DIRECTORY}/${id}.csv`;

  const bucket = new AWS.S3({
    params: { Bucket: DATA_BUCKET },
    apiVersion: "2006-03-01",
  })

  const objParams = {
    Key: filename,
    Body: csv
  }

  bucket.putObject(objParams, function(err, data) {
    if (err) {
      console.log("Error: ", err.message);
    } else {
      console.log("Data: ", data);
    }
  });


}
You will then reference this saving function within on_finish or on_start tags within
your jsPsych timeline when you would like to save data to S3. Remember to pass
in a participant identifier and the data to be saved in CSV format. This will
look like:
...,
on_finish: function() {

  const id = "<whatever-the-subject-id-is>"
  const csv = jsPsych.data.get().csv()

  saveDataToS3(id, csv)

}
...
It’s very important that you follow this pattern. The on_finish or on_start piece of jsPsych
structures should use a generic function that contains the saveDataToS3 function. Do not directly call this function outside of these tags unless you understand what you are doing.
Configuring a CloudFront deployment
Now, you must create a CloudFront distribution for the S3 bucket. This will allow us to publish the task securely under the hbssurvey.com domain name.
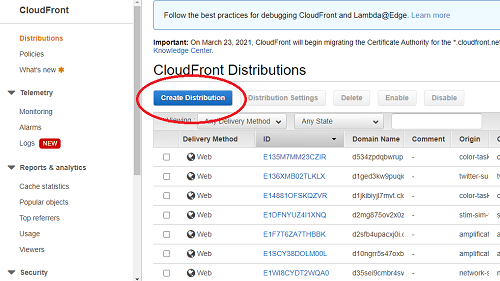
- Navigate to the CloudFront service. You can do this by typing “CloudFront” into the search bar.
- Click Create Distribution.
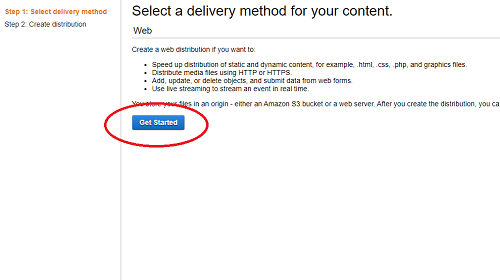
- Press Get Started under the “Web” method of content delivery.
- Paste the web address of your task’s S3 bucket in the field called Origin Domain Name. You can find this web address in the bucket page under “Properties” and then “Static Web Hosting.” See Update bucket to host task for more info.
- Where it asks for Viewer Protocol Policy, select Redirect HTTP to HTTPS.
- For the dropdown selector called Cache Policy, select Managed-CachingDisabled.
- For the option Compress Objects Automatically, select Yes.
- You must make an Alternate Domain Name (CNAME) to link it to our lab’s study web domain. To do so,
you will include text describing your task, such as
example-task-name-and-phase.hbssurvey.com.- This is the web address that participants will see when they access the task.
- If you bucket name is
amplification-sad-amit-march-21-pilot, a good web address name isamplification-s-pilot.hbssurvey.com - Be mindful of the names you select and try not to “spoil” participation. For example, a task called
amplification-race-pilotwas changed toamplification-r-pilot.hbssurvey.combecause we did not want to spoil participants on the fact that this task contained elements related to race.
- (2024 UPDATE) For Web Application Firewall (WAF), select Do not enable security protections. Otherwise, you will not have access to submit the distribution.
- For SSL Certificate, select Custom SSL Certificate (example.com). Then select
from the dropdown
*.hbssurvey.com (a715bbbd-ad62-49a0-8c75-9fdb9d542633)- UPDATE: You are likely to receive a warning saying the SSL Certificate is not valid. Just ignore it and go ahead because there is no evidence so far that this will cause any issues in the experiment.
- Submit by choosing Create Distribution again.
Once these steps are completing, AWS will begin deploying the task. Typically, the wait should be less than ten minutes (in extreme cases it can take a few hours). Once ready, you’ll be able to navigate to your deployed task website.
Configuring task web domain on Route 53
With a CloudFront deployment of a task, the final step to making it ready for participants
is to create a subdomain on our lab’s study domain (e.g., new-task-name-and-phase.hbssurvey.com).
You will need your CloudFront deployment’s URL to complete this step. You can find the CloudFront URL on the CloudFront home page. The URL will look similar to
dbmsd35c91.cloudfront.net.
- Navigate to the Route 53 service by searching for “Route 53”.
- Click Hosted zones.
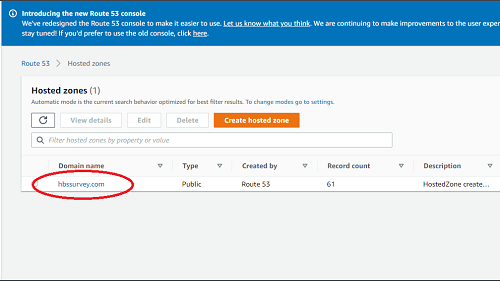
- Then click the hbssurvey.com domain link in the table.
- A list in a table called “Records” will appear. Click Create record.
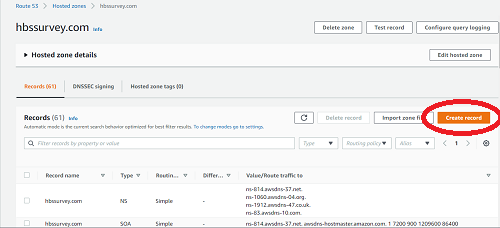
- Make sure that “Record Type” is “A” and “Routing policy” is Simple routing.
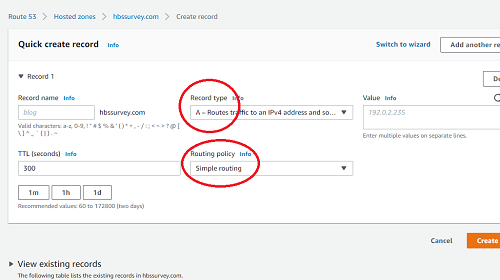
- Do the following for the rest of the record:
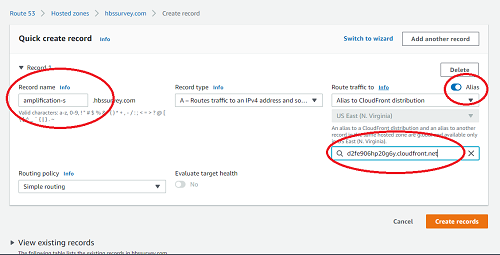
- For “Record name”, write the
hbssurvey.comURL you gave to the task during the CloudFront phase. This should match exactly the name you give to the CloudFront distribution. So, if your CloudFront distribution URL wasamplification-s-pilot.hbssurvey.com, thenamplification-s-pilotinto the textbox. - For “Value/Route traffic to”, select “Alias to CloudFront distribution”. It should automatically
fill in “US East (N. Virginia)” for the region. Then, “Choose distribution” will provide in a dropdown
the names of CloudFront distributions that are equipped for the exact name used as a CNAME in the previous
set of steps. The distribution you should match the CloudFront URL (i.e.,
dbmsd35c91.cloudfront.net).
- Press “Add another record.” Create a new record following the same steps, changing “Record type” to “AAAA” this time.

- For “Record name”, write the
- When you have two records, one of type A and one of type AAAA, click Create records.
What next?
Congratulations! You’re done!
Now you will find your task at the hbssurvey.com address that you configured for it. Proceed to this tutorial to learn how to prepare your task to go live on the web!
Specific task variations
Calling the SaveDataToS3 function without passing in arguments (for Sequential and Amplification Tasks)
-
Make sure function
saveDataToS3is in thefunctions.jsfile and not the main HTML file. -
Modify the function so that
idrefers to the globalFace.IDvariable. NowsaveDataToS3can be called without passing in arguments.
function saveDataToS3() {


  id = Face.ID
  csv = jsPsych.data.get().csv()

  AWS.config.update({
    region: "us-east-1",
    credentials: new AWS.CognitoIdentityCredentials({
      IdentityPoolId: cognitoIdentityPool
    }),
  });

  const filename = `${DIRECTORY}/${id}.csv`;

  const bucket = new AWS.S3({
    params: { Bucket: DATA_BUCKET },
    apiVersion: "2006-03-01",
  })

  const objParams = {
    Key: filename,
    Body: csv
  }

  bucket.putObject(objParams, function(err, data) {
    if (err) {
      console.log("Error: ", err.message);
    } else {
      console.log("Data: ", data);
    }
  });


}
- Modify the following variables to contain the
saveDataToS3function. Not that sometimes the function fails to work withon_finishand instead we useon_start.
var imageDescription = {
    type: 'survey-text',
    questions: [{prompt: "Please describe the picture in your own words"}],
    preamble: function() {
      var curr_stim = imageTestDescription.shift()
      return '<img src='+curr_stim+'></img>';
    },
    on_finish: function(data){
      saveDataToS3()
      Face.description = JSON.parse(data.responses).Q0; } //save description
  };


var attentionCheck = { //function for the attention check
    timeline: [askTypeWord],
    loop_function: checkTyping,
    on_start: function(data){
      saveDataToS3()}
  };

  var connectSurvey = {
      type: 'image-button-response',
      stimulus: "",
      choices: ['Begin Survey'],
      on_finish: function(data){
      saveDataToS3()}
  };
- Final notes of modifications: make new distinction between EU and US consent, get rid of references to
checkUserfunction (temporarily until we construct a new one), change the order of items pushed intocollective_emotion_estimationtimeline
var participant_id = { //to check if participants have entered ID (number/character, no punctuation allowed)
    timeline: [enter_id],
    loop_function: checkID,
    // loop_function: checkUser
  };

collective_emotion_estimation.push(checkPhone, participant_id, imageDescription);